Actionable Items to make your WordPress Website ADA Compliant
(and why it’s good for your SEO too!)
There's no exact formula for making your website ADA Compliant but here's your go-to guide to increase accessibility and minimize legal risk.
There is a strong business case for accessibility - don’t underestimate that. Accessible websites have better search results and increased audience reach. Which translates to increased profit margin.
*None of these links are affiliate links; they simply contain approaches we've found most helpful after researching, implementing and testing numerous options. **We do not guarantee or warranty or promise that implementing any or all of these changes will ensure protection from legal liability or suit. That’s our fine print. Just like you, we are committed to ensure equality across the screen. We also want to protect ourselves.
1. Add image titles, ALT tags and description.
SKILL LEVEL: Beginner
EFFORT LEVEL: High (but mostly depending on the size of your site)
STRONGLY SUGGESTED
All images should have descriptive titles rather than IMG9494.jpg. Descriptive titles tell search engines and page readers what the image is actually about. Hopefully you’ve already been doing this for SEO anyway, but if not, now is high time.
If you are uploading a new image make sure the file title is descriptive of the image itself. For example: "Company-Name-Service-Provided-Image-Overview.jpg" The point is that now even those who cannot see will understand your image.
To add ALT (Alternate Text) tags and descriptions, go into your Media Library, click the desired file and add relevant text into the fields. Example below. Note the text is slightly different but always representative of the image.

If you have a pre-existing image with a non descriptive title, it might be helpful to use Enable Media Replace plugin. This plugin allows you remain in the Media Library to re-upload and rename so you don't have enter every specific page to delete the old images and upload a new ones.
2. Install WP Accessibility (free)
SKILL LEVEL: Medium to Advanced
EFFORT LEVEL: Medium to High
STRONGLY SUGGESTED
The WP Accessibility plugin helps rectify more technical settings. Once installed and activated, go to Dashboard > Settings > WP Accessibility.
In short, to ensure the highest level of accessibility and for the most protection, try to click as many of these boxes as possible. Some may be too techy or simply an eyesore on the site you don’t want to endure.
The first section - Add Skip Links
Imagine how you typically view a site: You quickly see the navigation then your eyes focus down on the main content or you first see the main content and you may glance up at the navigation. If you are using a screen reader, the whole navigation is read aloud. Which is helpful but can also be cumbersome... especially three or four pages deep into a site.
Adding a skip link (also known as jump link or toggle) allows people/screen readers to quickly bypass the navigation. So skip links are great to have BUT it requires that the main content on the page has a particular ID set. In this case, I added #content as the ID to the top section of all of my pages. (You may need your tech support to help you with this.) Adding a skip link to the navigation is also encouraged. *Note, I chose not to enable “Skip links always visible” because I wasn’t a fan of the notification on the live site.
Does your site have a site map? Hopefully you’ve already submitted one to Google and other search engines. There should also be a page on your site with the site map listed. It doesn’t have to be live on your navigation though many choose to add it to their footer. To make your website ADA Compliant, all you need is to have a link (see where we added ours below). Then click the update button on this section and preview the changes on your home page.

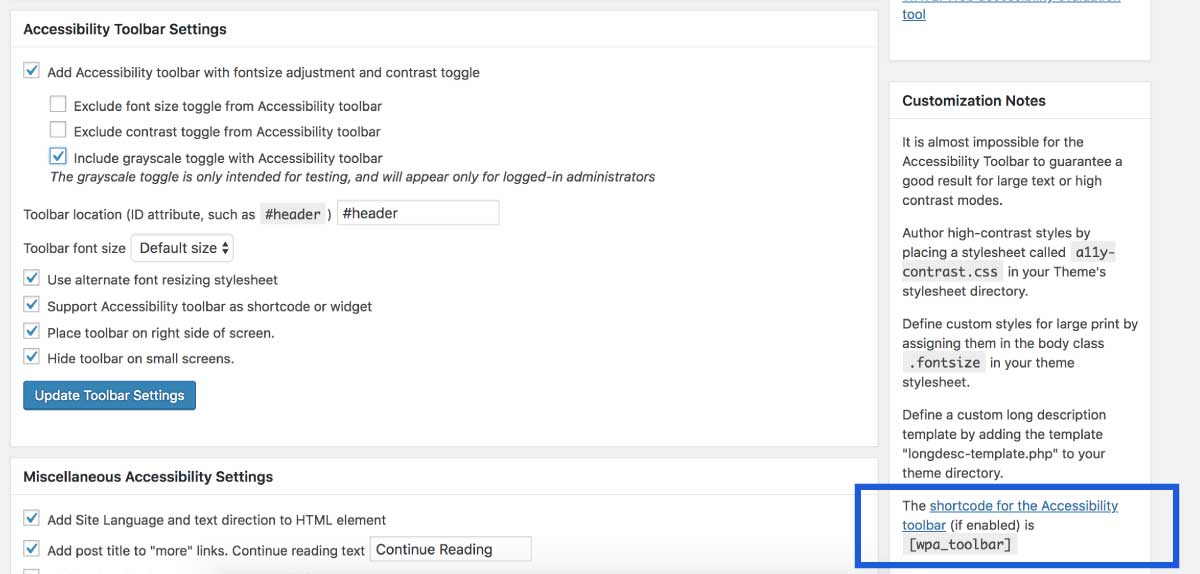
The second section - Accessibility Toolbar Settings
I’ve chosen not to enable this section because I have a strong preference for the UserWay plugin (see the section below). It’s much more aesthetically pleasing and has some cool features which I’ll go into below. If you to want to use the WP Accessibility toolbar, I recommend configuring it this way:
Note the blue box on the lower right. To see the Toolbox live on your site you either have to add this shortcode or go into your Widgets (Dashboard > Widgets) and add the section to a Sidebar.
The third section - Miscellaneous Accessibility Settings
Again, try to check as many of these boxes possible BUT do check how they affect your site. Some fall into the best practice category like adding your website language to the header (<<< VERY IMPORTANT) or adding the name of the blog post to "Continue Reading" buttons. The Color Contrast section below the Accessibility Toolbar Settings may be of interest to you if you have a very uniform looking site but hopefully you don't have say, white text over super light images. Google also penalizes sites with low contrast. Yet another reason by getting your website ADA compliant will boost SEO.
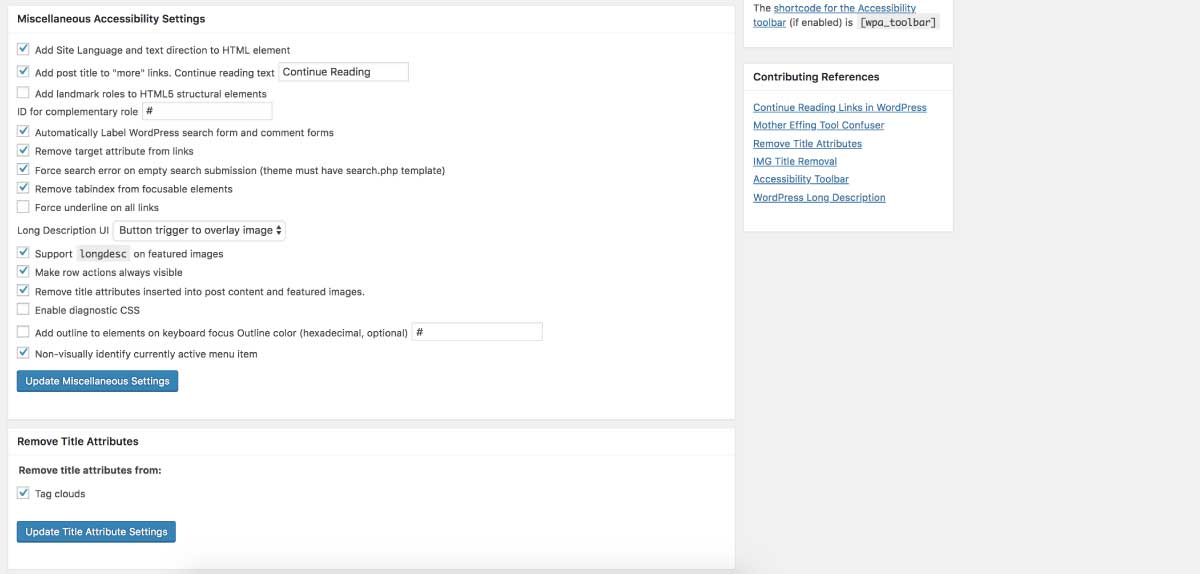
*** IF your website uses Gravity Forms, consider adding WCAG 2.0 form field for Gravity Forms. Making your forms accessible using the keyboard tab key is an absolute must. Furthermore you can add a message above the form stating something along the lines of "If you are struggling to fill out this form you can call us at..."
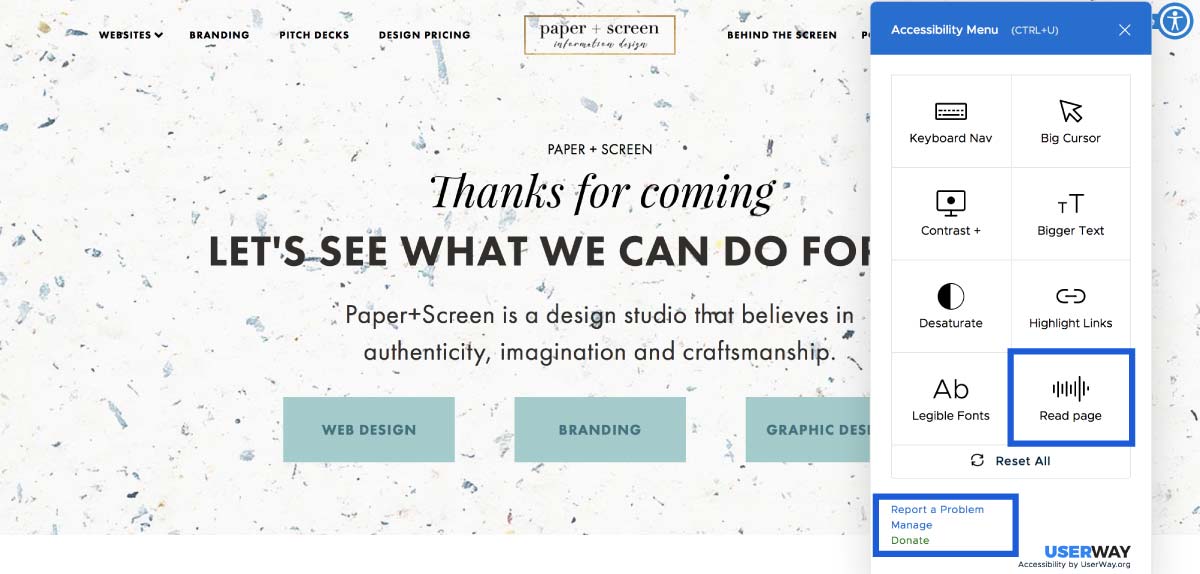
3. Install Accessibility by UserWay Plugin (free unless you want to remove their branding)
SKILL LEVEL: Beginner
EFFORT LEVEL: Minimal
SUGGESTED BUT MOST LIKELY NOT NECESSARY
This is a great plugin for testing your site. My personal thought is that folks with disabilities will have a preferred (and probably better) screen reader on their computer but this plugin will give you a solid idea of how effectively your site functions using Accessibility support. Millions of people can't use a mouse and rely solely on their keyboard to navigate websites. Your site should be fully navigable using a keyboard’s tab key, arrow keys, the enter key and the space bar. Give it a shot yourself and see how your site stacks up!
So Accessibility by UserWay creates a simpler and more accessible browsing experience for users with mobility issues. Once installed and activated, go to Dashboard > Settings > UserWay. Plugin your info. Once you receive an email, go to your homepage, click the icon and look for Manage at the bottom left. Add your credentials from the email and have fun viewing your site (most likely) like you've never viewed it before. LISTEN to your site. Is it clear? Can you easily follow?
If you want to put your best foot forward, keep the plugin installed. There are two icon size options and a premium white label option as well.
Best Practices for keeping your Website ADA Compliant
STRONGLY SUGGESTED
- Always create alt tags for all images. (See section one above if you jumped down to this section.)
- Create text transcripts for video and audio content: Text transcripts help hearing impaired users understand content that would otherwise be inaccessible to them.
- Create a consistent, organized layout: Menus, links and buttons should be organized in such a way that they are clearly delineated from one another.
- Convert absolute font sizes found in content to relative font size units (% or em). So your fonts settings should look like 1.2em rather than 14px.
- Then go a step further and make all text left aligned because people with cognitive disabilities often struggle with blocks of text that are justified.
- Ensure there is good contrast between text and background. Google already penalizes sites that don’t have strong contrast.
- Stop using ambiguous “click here” links or buttons. Instead, write, “View our Branding Guide here” or “Read more about essential oils here”
- Make sure each page has at least one h1 tag, and use heading tags in order: h1, h2, h3 and so on. The structure of your page should be easy to read. Note, you can use multiple h2, h3, h4, etc. tags but there should be only one h1 tag.
- Don’t use auto-playing media or carousels. If you aren’t already annoyed with them, consider yourself lucky. Auto-playing can interfere with screen readers and may be distressing for people with impairments.
- Ensure the HTML rendering of icons and form fields are screen reader friendly. For anything interactive or text inside, or a label, you can add hidden text specifically targeted for screen readers.
Hire Us
Audit and Implementation Packages
Under 10 page site
$1,200+
Turnaround
1 week
10-29 page site
$1,500-$5,000
1-2 weeks
Over 30 page site
$4,000+
2-3 weeks
All packages include:
- Initial Audit
- Correcting image file names, adding ALT tags, and descriptions
- Installing and configuring WP Accessibility to your specific website and brand standards
- Installing UserWay and walking through every page of the site, searching for errors
- Running your site through AChecker
- Performing an additional audit with Google Developer tools
- An itemized overview of all of the changes that were implemented
- Reviewing the site via the "best practice" lens outlined above and delivering a clear list of action items you can send to your tech team or we can implement under a new project contract
Pricing is on a site-by-site basis. Fill out the form to request our help in getting your WordPress website ADA compliant. We will respond to you within 48 hours requesting Admin Access. We are happy to sign a non-disclosure or confidentiality agreement. Once we login, we will confirm that we are able to work on your site and will send an exact project quote, timeline and invoice.

Sierra Verunica started Paper+Screen as an outlet for her need to constantly create. Originally leaning heavily toward graphic design and visuals, the tables turned and she now finds her creative outlets through devising highly converting websites and holistic digital strategies. When she's not in front of the screen, she's basking in the glory of the Slovenian countryside with her two little kids and husband... and most likely an IPA in hand.